Navigate around the scene
You can move around the scene to view it from different locations and angles, and work at different locations.
Moving and rotating the view
-
Press and hold the
squeezebutton on only one of the controllers.Note: If you're holding the main
squeezebutton, make sure the main cursor is not intersecting with any item in the scene. -
Move the controller to move the scene.
- Rotate the controller to change the angle you're viewing.
- Release the
squeezebutton to stop moving.
Zooming in and out of the scene
-
Press and hold the
squeezebutton on both the controllers.Note: Make sure the main cursor is not intersecting with any item in the scene.
-
Move your hands towards each other to zoom-out, or move your hands away from each other to zoom-in.
- Release the
squeezebuttons to stop zooming.
This is similar to how pinch-to-zoom behaves on touch screens for zooming in and out of photos.
Walk mode
- Point at the main menu, and click on the
WALKoption using your main hand'striggerbutton. - Use the left controller's joystick to move forward/back/left/right.
- Use the right controller's joystick to turn right/left, or move up/down (vertically).
- You can disable walk mode by clicking the
WALKbutton again.
Lock Z axis rotation
If Lock Z axis rotation is enabled (in Freebird Settings), Freebird will always keep your view pointed "upwards". This helps reduce motion-sickness for a majority of users.
You can disable this setting to allow you to navigate the scene at all angles. For e.g., this allows you to view objects from under them, and look around freely at any angle.
-
Open
Freebird Settings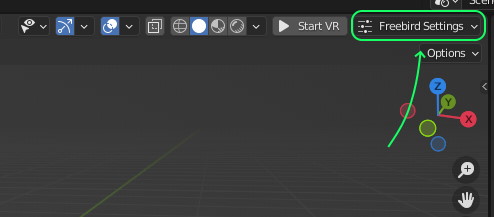
-
Disable
Lock Z axis rotation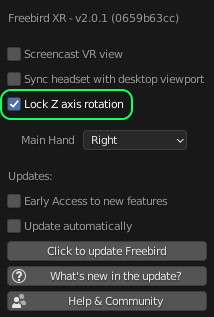
After disabling this, you can press the squeeze button on any one controller and rotate it. This will rotate the view to any desired angle.
Scene scale indicator
The controller menu (the small panel on the alternate controller, below the main menu) shows the current scene scale, as a readout like Scale: 1:10 or Scale: 14:1.
Scale: 1:10 means the scene is displayed zoomed out (i.e. objects appear smaller, as if you're viewing them from far away), and Scale: 14:1 means the scene is displayed zoomed in (i.e. objects appear larger, as if you're very close to them). Scale: 1:1 is the natural, human scale.
The readout updates automatically as you zoom in/out of the scene (see Zooming in and out of the scene above).
Reset the world scale
If you have zoomed the scene in or out, and want to go back to viewing it at human scale, you can reset the world scale to 1:1.
Point at the main menu, and click on the 
RESET SCALE option in the gizmos panel (below the main menu) using your main hand's trigger button.
This will reset the world scale to 1:1 (see the Scene scale indicator readout above), while keeping your current position and view angle. This is useful for e.g. creating real-world objects, where you want to see the scene at its actual size.
Your position is saved across sessions
Your position in the scene (i.e. where you are, which angle you're looking at, and the zoom level) is saved with the project, and restored automatically when you start a new VR session. This also applies when you close and re-open a project.
This means you can continue working from the exact position where you left off, without having to navigate back to it. If you haven't moved around in the scene in VR yet, the scene camera's view will be used as the starting position.